This is a step wise and simple tutorial to make Bluetooth Controlled Robot arm.

Step 1: Requirements
•2 USB to serial cables
Step 2: Set up

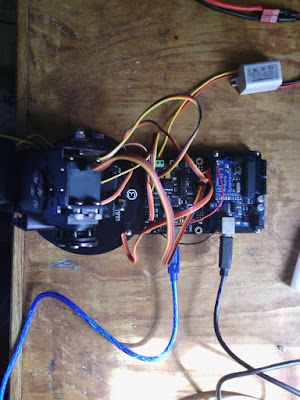
Connect the Arduino and SSC-32 boards.. Also remember to set the baud rate to 9600.

•Gripper Servo: HS-311 servo motor SSC-32 pin: 7
•Elbow joint Servo: DF15MG high torque SSC-32 pin: 20
•Base joint Servo: DF05BB high torque SSC-32 pin: 16
•Wrist (rotation) Servo: HS-311 servo motor SSC-32 pin: 4
•Shoulder joint Servo: DF15MG high torque SSC-32 pin: 19
•Wrist (y axis) Servo: DF05BB high torque SSC-32 pin: 15

You can use your own configuration. You do not have to connect the servos on the pins I have specified.
Connect the power supply. In this case i am powering both servo channels with a battery and the logic via USB. You can check powering options to see the different powering options you have.

In the end of this tutorial I am upload a sample code you can check it.
Step 3: Arduino arm code
void setup() //initializing serial communication baud rate
{
Serial.begin(9600);
}
/* Procedures to be used in the Demo.
Move the object from the ground onto the platform.
*/
void homes()//returns to initial position
{
Serial.println("#7 P1000 T500");
delay(1000);
Serial.println("#4 P1300 T500");
delay(1000);
Serial.println("#15 P2350 T500");
delay(1000);
Serial.println("#19 P1000 T500");
delay(1000);
Serial.println("#16 P500 T500");
delay(1000);
}
void foward()//moves the arm forward
{
Serial.println("#20 P1200 T1000");
delay(1000);
Serial.println("#19 P1300 T1000");
delay(1000);
Serial.println("#15 P1800 T1000");
delay(1000);
}
void back1()//moving the arm backwards
{
Serial.println("#19 P1000 T500");
delay(1000);
Serial.println("#15 P2350 T500");
delay(1000);
}
void back2()//moving the arm backwards
{
Serial.println("#15 P2330 T500");
delay(500);
Serial.println("#16 P1500 #19 P1000 #20 P1200 T1000");
delay(500);
}
void lift()//lifts the robot arm
{
Serial.println("#16 P2400 #19 P1300 #20 P1700 T1000");
delay(1000);
}
void grip()//Gripping the object
{
Serial.println("#7 P1550 T500");
delay(1000);
}
void drop()//Drops the object
{
Serial.println("#15 P1900 T500");//moves wrist servo to position 1900
delay(1000);
Serial.println("#7 P1000 T1000");
delay(500);
}
void turnC()//turns the arm clockwise
{
Serial.println("#16 P500 T1000");
delay(1000);
}
void turnA()//turns the arm anticlockwise
{
Serial.println("#16 P2400 T1000");
delay(1000);
}
void halfturn()//turns the arm clockwise
{
Serial.println("#16 P1500 T1000");
delay(1000);
}
void loop()
{
//Pick the object and place it on platform
homes();
delay(1000);
foward();
delay(1000);
grip();
delay(1000);
back1();
delay(1000);
halfturn();
delay(500);
lift();
delay(2000);
drop();
delay(1000);
back2();
delay(500);
}
After the wiring and uploading the code this project is successfully complete. Have fun with this project.
No comments:
Post a Comment